Chapter 12: Components and plugins
Components and plugins
Components and plugins are relatively new features of web2py, and there is some disagreement between developers about what they are and what they should be. Most of the confusion stems from the different uses of these terms in other software projects and from the fact that developers are still working to finalize the specifications.
However, plugin support is an important feature and we need to provide some definitions. These definitions are not meant to be final, just consistent with the programming patterns we want to discuss in this chapter.
We will try to address two issues here:
- How can we build modular applications that minimize server load and maximize code reuse?
- How can we distribute pieces of code in a more or less plugin-and-play fashion?
Components address the first issue; plugins address the second.
Components, LOAD and Ajax
A component is a functionally autonomous part of a web page.
A component may be composed of modules, controllers and views, but there is no strict requirement other than, when embedded in a web page, it must be localized within an html tag (for example a DIV, a SPAN, or an IFRAME) and it must perform its task independently of the rest of the page. We are specifically interested in components that are loaded in the page and communicate with the component controller function via Ajax.
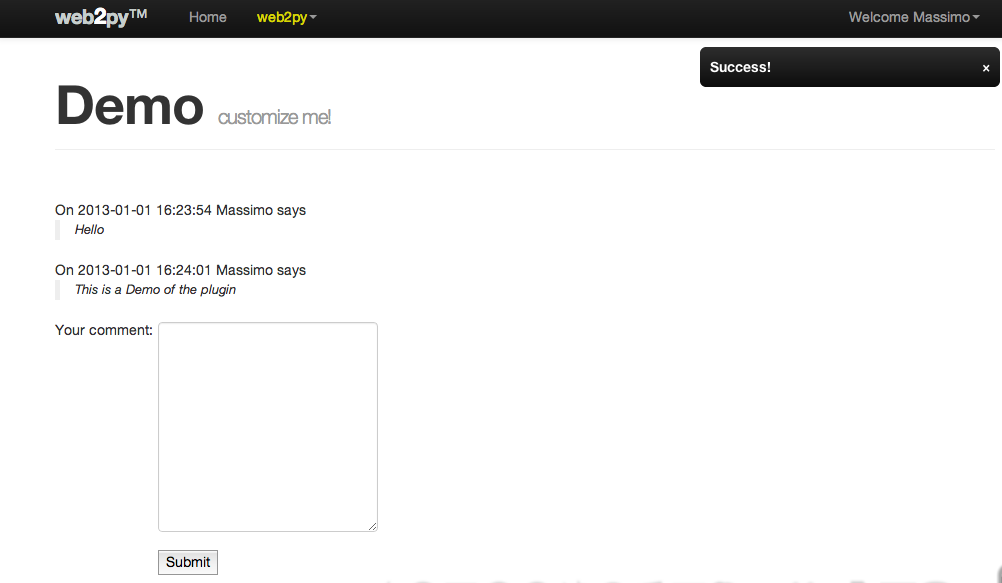
An example of a component is a "comments component" that is contained into a DIV and shows users' comments and a post-new-comment form. When the form is submitted, it is sent to the server via Ajax, the list is updated, and the comment is stored server-side in the database. The DIV content is refreshed without reloading the rest of the page.
LOAD
The web2py LOAD function makes this easy to do without explicit JavaScript/Ajax knowledge or programming.
Our goal is to be able to develop web applications by assembling components into page layouts.
Consider a simple web2py app "test" that extends the default scaffolding app with a custom model in file "models/db_comments.py":
db.define_table('comment_post',
   Field('body', 'text', label='Your comment'),
   auth.signature)
one action in "controllers/comments.py"
@auth.requires_login()
def post():
    return dict(form=SQLFORM(db.comment_post).process(),
                comments=db(db.comment_post).select())
and the corresponding "views/comments/post.html"
{{extend 'layout.html'}}
{{for post in comments:}}
<div class="post">
  On {{=post.created_on}} {{=post.created_by.first_name}}
  says <span class="post_body">{{=post.body}}</span>
</div>
{{pass}}
{{=form}}
You can access it as usual at:
http://127.0.0.1:8000/test/comments/post
So far there is nothing special in this action, but we can turn it into a component by defining a new view with extension ".load" that does not extend the layout.
Hence we create a "views/comments/post.load":
{{for post in comments:}}
<div class="post">
  On {{=post.created_on}} {{=post.created_by.first_name}}
  says <blockquote class="post_body">{{=post.body}}</blockquote>
</div>
{{pass}}
{{=form}}
We can access it at the URL
http://127.0.0.1:8000/test/comments/post.load
This is a component that we can embed into any other page by simply doing
{{=LOAD('comments', 'post.load', ajax=True)}}
For example in "controllers/default.py" we can edit
def index():
    return dict()
and in the corresponding view add the component:
{{extend 'layout.html'}}
{{=LOAD('comments', 'post.load', ajax=True)}}
Visiting the page
http://127.0.0.1:8000/test/default/index
will show the normal content and the comments component:
The {{=LOAD(...)}} component is rendered as follows:
<script type="text/javascript"><!--
web2py_component("/test/comment/post.load", "c282718984176")
//--></script><div id="c282718984176">loading...</div>
(the actual generated code depends on the options passed to the LOAD function).
The web2py_component(url, id) function is defined in "web2py_ajax.html" and it performs all the magic: it calls the url via Ajax and embeds the response into the DIV with corresponding id; it traps every form submission into the DIV and submits those forms via Ajax. The Ajax target is always the DIV itself.
LOAD signature
The full signature of the LOAD helper is the following:
LOAD(c=None, f='index', args=[], vars={},
     extension=None, target=None,
     ajax=False, ajax_trap=False,
     url=None, user_signature=False,
     timeout=None, times=1,
     content='loading...', **attr):
Here:
- the first two arguments
candfare the controller and the function that we want to call respectively. argsandvarsare the arguments and variables that we want to pass to the function. The former is a list, the latter is a dictionary.extensionis an optional extension. Notice that the extension can also be passed as part of the function as inf='index.load'.targetis theidof the target DIV. If it is not specified a random targetidis generated.ajaxshould be set toTrueif the DIV has to be filled via Ajax and toFalseif the DIV has to be filled before the current page is returned (thus avoiding the Ajax call). If set toFalse, the component's code and view will be executed in the same web2py environment as the caller.ajax_trap=Truemeans that any form submission in the DIV must be captured and submitted via Ajax, and the response must be rendered inside the DIV.ajax_trap=Falseindicates that forms must be submitted normally, thus reloading the entire page.ajax_trapis ignored and assumed to beTrueifajax=True.url, if specified, overrides the values ofc,f,args,vars, andextensionand loads the component at theurl. It is used to load as components pages served by other applications (which may or may not be created with web2py). Note that usingurlassumesajaxasTruealways, because web2py can't know in advance if the component is rendered within web2py or is just an external pageuser_signaturedefaults to False but, if you are logged in, it should be set to True. This will make sure the ajax callback is digitally signed. This is documented in chapter 4.timesspecifies how many times the component is to be requested. Use "infinity" to keep loading the component continuously. This option is useful for triggering regular routines for a given document request.timeoutsets the time to wait in milliseconds before starting the request or the frequency iftimesis greater than 1.contentis the content to be displayed while performing the ajax call. It can be a helper as incontent=IMG(..).- optional
**attr(attributes) can be passed to the containedDIV.
If no .load view is specified, there is a generic.load that renders the dictionary returned by the action without layout. It works best if the dictionary contains a single item.
If you LOAD a component having the .load extension and the corresponding controller function redirects to another action (for example a login form), the .load extension propagates and the new url (the one to redirect too) is also loaded with a .load extension.
Redirect from a component
To redirect from a component, use this:
redirect(URL(...), client_side=True)
but note that the redirected URL will default to the extension of the component. See notes about the argument extension in the URL function in Chapter 4
Reload page via redirect after component submission
If you call an action via Ajax and you want the action to force a redirect of the parent page you can do it with a redirect from the LOADed controller function. If you want to reload the parent page, you can redirect to it. The parent URL is known (see Client-Server component communications )
so after processing the form submit, the controller function reloads the parent page via redirect:
if form.process().accepted:
    ...
    redirect(request.env.http_web2py_component_location, client_side=True)
Note that the section below, Client-Server component communications, describes how the component can return javascript, which could be used for more sophisticated actions when the component is submitted. The specific case of reloading another component is described next.
Reload another component
If you use multiple components on a page, you may want the submission of one component to reload another. You do this by getting the submitted component to return some javascript.
It's possible to hard-code the target DIV, but in this recipe we use a query-string variable to inform the submitting-controller which component we want to reload. It's identified by the id of the DIV containing the target component. In this case, the DIV has id 'map'. Note that it is necessary to use target='map' in the LOAD of the target; without this, the target id is randomised and reload() won't work. See LOAD signature above.
In the view, do this:
{{=LOAD('default', 'submitting_component.load', ajax=True, vars={'reload_div':'map'})}}
The controller belonging to the submitting component needs to send javascript back, so just add this to the existing controller code when processing the submit:
if form.process().accepted:
...
    if request.vars.reload_div:
        response.js =  "jQuery('#%s').get(0).reload()" % request.vars.reload_div
(Of course, remove the redirect if you were using the approach of the previous section.)
That's it. web2py's javascript libraries look after the reload. This could be generalised to handle multiple components with javascript looking like:
jQuery('#div1,#div2,#div3').get(0).reload()
For more information about response.js see Client-Server component communications (below).
Ajax post does not support multipart forms
Because Ajax post does not support multipart forms, i.e. file uploads, upload fields will not work with the LOAD component. You could be fooled into thinking it would work because upload fields will function normally if POST is done from the individual component's .load view. Instead, uploads are done with ajax-compatible 3rd-party widgets and web2py manual upload store commands.
LOAD and Client-Server component communications
When the action of a component is called via Ajax, web2py passes two HTTP headers with the request:
web2py-component-location
web2py-component-element
which can be accessed by the action via the variables:
request.env.http_web2py_component_location
request.env.http_web2py_component_element
The latter is also accessible via:
request.cid
The former contains the URL of the page that called the component action. The latter contains the id of the DIV that will contain the response.
The component action can also store data in two special HTTP response headers that will be interpreted by the full page upon response. They are:
web2py-component-flash
web2py-component-command
and they can be set via:
response.headers['web2py-component-flash']='....'
response.headers['web2py-component-command']='...'
or (if the action is called by a component) automatically via:
response.flash='...'
response.js='...'
The former contains text that you want to be flashed upon response. The latter contains JavaScript code that you want to be executed upon response. It cannot contain newlines.
As an example, let's define a contact form component in "controllers/contact/ask.py" that allows the user to ask a question. The component will email the question to the system administrator, flash a "thank you" message, and remove the component from the page:
def ask():
    form=SQLFORM.factory(
        Field('your_email', requires=IS_EMAIL()),
        Field('question', requires=IS_NOT_EMPTY()))
    if form.process().accepted:
        if mail.send(to='admin@example.com',
                  subject='from %s' % form.vars.your_email,
                  message = form.vars.question):
            response.flash = 'Thank you'
            response.js = "jQuery('#%s').hide()" % request.cid
        else:
            form.errors.your_email = "Unable to send the email"
    return dict(form=form)
The first four lines define the form and accept it. The mail object used for sending is defined in the default scaffolding application. The last four lines implement all the component-specific logic by getting data from the HTTP request headers and setting the HTTP response headers.
Now you can embed this contact form in any page via
{{=LOAD('contact', 'ask.load', ajax=True)}}
Notice that we did not define a .load view for our ask component. We do not have to because it returns a single object (form) and therefore the "generic.load" will do just fine. Remember that generic views are a development tool. In production you should copy "views/generic.load" into "views/contact/ask.load".
user_signature argument:{{=LOAD('contact', 'ask.load', ajax=True, user_signature=True)}}
which add a digital signature to the URL. The digital signature must then be validated using a decorator in the callback function:
@auth.requires_signature()
def ask(): ...
Trapped Ajax links and the A Helper
Normally a link is not trapped, and by clicking in a link inside a component, the entire linked page is loaded. Sometimes you want the linked page to be loaded inside the component. This can be achieved using the A helper:
{{=A('linked page', _href='http://example.com', cid=request.cid)}}
If cid is specified, the linked page is loaded via Ajax. The cid is the id of the html element where to place the loaded page content. In this case we set it to request.cid, i.e. the id of the component that generates the link. The linked page can be and usually is an internal URL generated using the URL helper .
Plugins
A plugin is any subset of the files of an application.
and we really mean any:
- A plugin is not a module, is not a model, it is not a controller, is not a view, yet it may contain modules, models, controllers and/or views.
- A plugin does not need to be functionally autonomous and it may depend on other plugins or specific user code.
- A plugin is not a plugins system and therefore has no concept of registration nor isolation, although we will give rules to try to achieve some isolation.
- We are talking about a plugin for your app, not a plugin for web2py.
So why is it called a plugin? Because it provides a mechanism for packing a subset of an app and unpacking it over another app (i.e. plug-in). Under this definition, any file in your app can be treated as a plugin.
When the app is distributed, its plugins are packed and distributed with it.
In practice, the admin provides an interface for packing and unpacking plugins separately from your app. Files and folder of your application that have names with the prefix plugin_name can be packed together into a file called:
web2py.plugin.name.w2p
and distributed together.
Any file can be made part of a plugin and these files are not treated by web2py any differently than other files. Except that files and folder in that have a plugin_ prefix are recognized by admin and grouper together by admin according to their postfix name. admin treats them differently, not web2py.
In practice we will only be concerned with two types of plugins:
- Component Plugins. These are plugins that contain components as defined in the previous section. A component plugin can contain one or more components. We can think for example of a
plugin_commentsthat contains the comments component proposed above. Another example could beplugin_taggingthat contains a tagging component and a tag-cloud component that share some database tables also defined by the plugin. - Layout Plugins. These are plugins that contain a layout view and the static files required by such layout. When the plugin is applied it gives the app a new look and feel.
By the above definitions, the components created in the previous section, for example "controllers/contact.py", are already plugins. We can move them from one app to another and use the components they define. Yet they are not recognized as such by admin because there is nothing that labels them as plugins. So there are two problems we need to solve:
- Name the plugin files using a convention, so that admin can recognize them as belonging to the same plugin
- If the plugin has model files, establish a convention so that the objects it defines do not pollute the namespace and do not conflict with each other.
Let's assume a plugin is called name. Here are the rules that should be followed:
Rule 1: Plugin models and controllers should be called, respectively
models/plugin_name.pycontrollers/plugin_name.py
and plugin views, modules, static, and private files should be in folders called, respectively:
views/plugin_name/modules/plugin_name/static/plugin_name/private/plugin_name/
Rule 2: Plugin models can only define objects with names that start with
plugin_namePluginName_
Rule 3: Plugin models can only define session variables with names that start with
session.plugin_namesession.PluginName
Rule 4: Plugins should include license and documentation. These should be placed in:
static/plugin_name/license.htmlstatic/plugin_name/about.html
Rule 5: The plugin can only rely on the existence of the global objects defined in scaffolding "db.py", i.e.
- a database connection called
db - an
Authinstance calledauth - a
Crudinstance calledcrud - a
Serviceinstance calledservice
Some plugins may be more sophisticated and have a configuration parameter in case more than one db instance exists.
Rule 6: If a plugin needs configuration parameters, these should be set via a PluginManager as described below.
By following the above rules we can make sure that:
- admin recognizes all the
plugin_name files and folder as part of a single entity. - plugins do not interfere with each other.
The rules above do not solve the problem of plugin versions and dependencies. That is beyond our scope.
Component plugins
Component plugins are plugins that define components. Components usually access the database and define with their own models.
Here we turn the previous comments component into a comments_plugin by using the same code we wrote before, but following all of the previous rules.
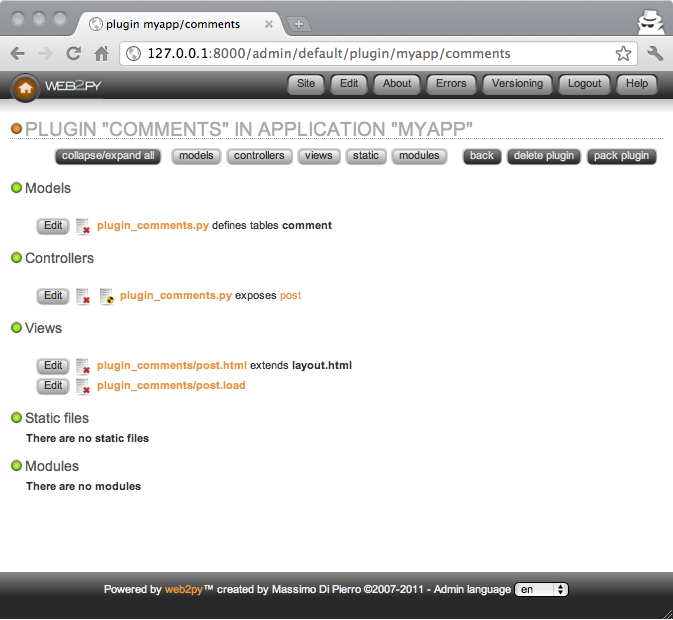
First, we create a model called "models/plugin_comments.py":
db.define_table('plugin_comments_comment',
   Field('body', 'text', label='Your comment'),
   auth.signature)

def plugin_comments():
    return LOAD('plugin_comments', 'post', ajax=True)
(notice the last two lines define a function that will simplify the embedding of the plugin)
Second, we define a "controllers/plugin_comments.py"
def post():
    if not auth.user:
        return A('login to comment', _href=URL('default', 'user/login'))
    comment = db.plugin_comments_comment
    return dict(form=SQLFORM(comment).process(),
                comments=db(comment).select())
Third, we create a view called "views/plugin_comments/post.load":
{{for comment in comments:}}
<div class="comment">
  on {{=comment.created_on}} {{=comment.created_by.first_name}}
  says <span class="comment_body">{{=comment.body}}</span>
</div>
{{pass}}
{{=form}}
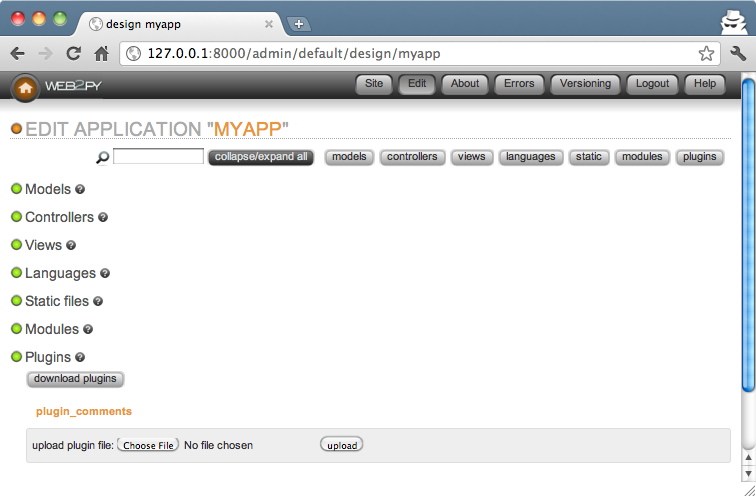
Now we can use admin to pack the plugin for distribution. Admin will save this plugin as:
web2py.plugin.comments.w2p
We can use the plugin in any view by simply installing the plugin via the edit page in admin and adding this to our own views
{{=plugin_comments()}}
Of course we can make the plugin more sophisticated by having components that take parameters and configuration options. The more complex the components, the more difficult it becomes to avoid name collisions. The Plugin Manager described below is designed to avoid this problem.
Plugin manager
The PluginManager is a class defined in gluon.tools. Before we explain how it works inside, we will explain how to use it.
Here we consider the previous plugin_comments and we make it better. We want to be able to customize:
db.plugin_comments_comment.body.label
without having to edit the plugin code itself.
Here is how we can do it:
First, rewrite the plugin "models/plugin_comments.py" in this way:
def _():
    from gluon.tools import PluginManager
    plugins = PluginManager('comments', body_label='Your comment')

    db.define_table('plugin_comments_comment',
        Field('body', 'text', label=plugins.comments.body_label),
        auth.signature)
    return lambda: LOAD('plugin_comments', 'post.load', ajax=True)
plugin_comments = _()
Notice how all the code except the table definition is encapsulated in a single function called _ so that it does not pollute the global namespace. Also notice how the function creates an instance of a PluginManager.
Now in any other model in your app, for example in "models/db.py", you can configure this plugin as follows:
from gluon.tools import PluginManager
plugins = PluginManager()
plugins.comments.body_label = T('Post a comment')
The
pluginsobject is already instantiated in the default scaffolding app in "models/db.py"
The PluginManager object is a thread-level singleton Storage object of Storage objects. That means you can instantiate as many as you like within the same application but (whether they have the same name or not) they act as if there were a single PluginManager instance.
In particular each plugin file can make its own PluginManager object and register itself and its default parameters with it:
plugins = PluginManager('name', param1='value', param2='value')
You can override these parameters elsewhere (for example in "models/db.py") with the code:
plugins = PluginManager()
plugins.name.param1 = 'other value'
You can configure multiple plugins in one place.
plugins = PluginManager()
plugins.name.param1 = '...'
plugins.name.param2 = '...'
plugins.name1.param3 = '...'
plugins.name2.param4 = '...'
plugins.name3.param5 = '...'
When the plugin is defined, the PluginManager must take arguments: the plugin name and optional named arguments which are default parameters. However, when the plugins are configured, the PluginManager constructor must take no arguments. The configuration must precede the definition of the plugin (i.e. it must be in a model file that comes first alphabetically).
Layout plugins
Layout plugins are simpler than component plugins because usually they do not contain code, but only views and static files. Yet you should still follow good practice:
First, create a folder called "static/plugin_layout_name/" (where name is the name of your layout) and place all your static files there.
Second, create a layout file called "views/plugin_layout_name/layout.html" that contains your layout and links the images, CSS and JavaScript files in "static/plugin_layout_name/"
Third, modify the "views/layout.html" so that it simply reads:
{{extend 'plugin_layout_name/layout.html'}}
{{include}}
The benefit of this design is that users of this plugin can install multiple layouts and choose which one to apply simply by editing "views/layout.html". Moreover, "views/layout.html" will not be packed by admin together with the plugin, so there is no risk that the plugin will override the user's code in the previously installed layout.
Plugin repositories, plugin install via admin
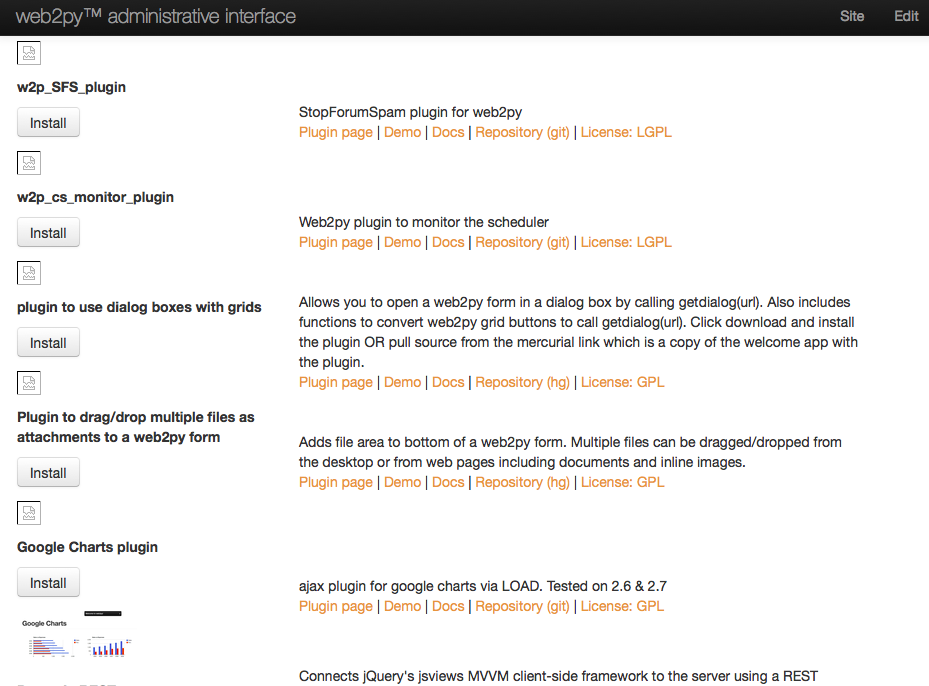
While there is no single repository of web2py plugins you can find many of them at one of the following URLs:
http://web2pyslices.com (this is the leading repository and is integrated to the web2py admin application for one-click installs)

http://web2py.com/plugins
http://web2py.com/layouts
Recent versions of web2py admin allow automatic fetch and install of plugins from web2pyslices. To add a plugin to an app, edit it via the admin application, and choose Download Plugins, currently at the bottom of the screen.
To publish your own plugins, make an account at web2pyslices.
Here is a screenshot showing some of the auto-installable plugins: