Chapter 9: Access Control
Access Control
web2py includes a powerful and customizable Role Based Access Control mechanism (RBAC).
Here is a definition from Wikipedia:
"Role-Based Access Control (RBAC) is an approach to restricting system access to authorized users. It is a newer alternative approach to mandatory access control (MAC) and discretionary access control (DAC). RBAC is sometimes referred to as role-based security.
RBAC is a policy neutral and flexible access control technology sufficiently powerful to simulate DAC and MAC. Conversely, MAC can simulate RBAC if the role graph is restricted to a tree rather than a partially ordered set.
Prior to the development of RBAC, MAC and DAC were considered to be the only known models for access control: if a model was not MAC, it was considered to be a DAC model, and vice versa. Research in the late 1990s demonstrated that RBAC falls in neither category.
Within an organization, roles are created for various job functions. The permissions to perform certain operations are assigned to specific roles. Members of staff (or other system users) are assigned particular roles, and through those role assignments acquire the permissions to perform particular system functions. Unlike context-based access control (CBAC), RBAC does not look at the message context (such as a connection's source).
Since users are not assigned permissions directly, but only acquire them through their role (or roles), management of individual user rights becomes a matter of simply assigning appropriate roles to the user; this simplifies common operations, such as adding a user, or changing a user's department.
RBAC differs from access control lists (ACLs) used in traditional discretionary access control systems in that it assigns permissions to specific operations with meaning in the organization, rather than to low level data objects. For example, an access control list could be used to grant or deny write access to a particular system file, but it would not dictate how that file could be changed."
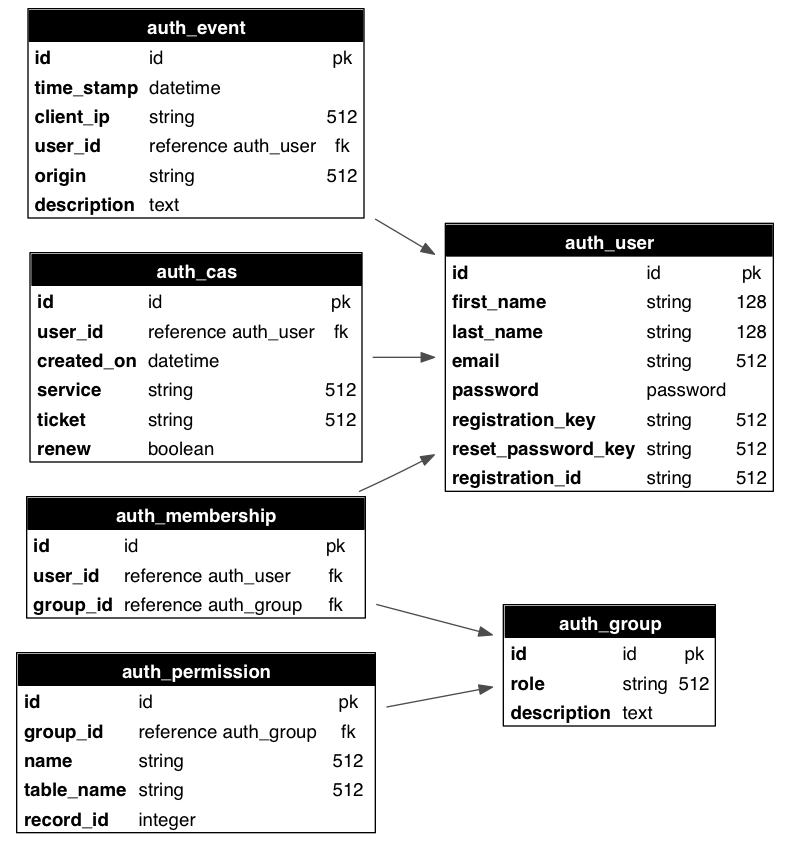
The web2py class that implements RBAC is called Auth.
Auth needs (and defines) the following tables:
auth_userstores users' name, email address, password, and status (registration pending, accepted, blocked)auth_groupstores groups or roles for users in a many-to-many structure. By default, each user is in its own group, but a user can be in multiple groups, and each group can contain multiple users. A group is identified by a role and a description.auth_membershiplinks users and groups in a many-to-many structure.auth_permissionlinks groups and permissions. A permission is identified by a name and, optionally, a table and a record. For example, members of a certain group can have "update" permissions on a specific record of a specific table.auth_eventlogs changes in the other tables and successful access via CRUD to objects controlled by the RBAC.auth_casis used for Central Authentication Service (CAS). Every web2py application is a CAS provider and can optionally be a CAS consumer.
The schema is reproduced graphically in the image below:
In principle, there is no restriction on the names of the roles and the names of the permissions; the developer can create them to fix the roles and permissions in the organization. Once they have been created, web2py provides an API to check if a user is logged in, if a user is a member of a given group, and/or if the user is a member of any group that has a given required permission.
web2py also provides decorators to restrict access to any function based on login, membership and permissions.
web2py also understands some specific permissions, i.e., those that have a name that correspond to the CRUD methods (create, read, update, delete) and can enforce them automatically without the need to use decorators.
In this chapter, we are going to discuss different parts of RBAC one by one.
Authentication
In order to use RBAC, users need to be identified. This means that they need to register (or be registered) and log in.
Auth provides multiple login methods. The default one consists of identifying users based on the local auth_user table. Alternatively, it can log in users against third-party authentication systems and single sign on providers such as Google, PAM, LDAP, Facebook, LinkedIn, Dropbox, OpenID, OAuth, etc..
To start using Auth, you need at least this code in a model file, which is also provided with the web2py "welcome" application and assumes a db connection object:
from gluon.tools import Auth
auth = Auth(db)
auth.define_tables(username=False, signature=False)
By default, web2py uses email for login. If instead you want to log in using username set auth.define_tables(username=True)
Setting signature=True adds user and date stamping to auth tables, to track modifications.
Auth has an optional secure=True argument, which will force authenticated pages to go over HTTPS.
By default, Auth protects logins against cross-site request forgeries (CSRF). This is actually provided by web2py's standard CSRF protection whenever forms are generated in a session. However, under some circumstances, the overhead of creating a session for login,password request and reset attempts may be undesirable. DOS attacks are theoretically possible. CSRF protection can be disabled for Auth forms (as of v 2.6):
Auth = Auth(..., csrf_prevention = False)
Note that doing this purely to avoid session overload on a busy site is not recommended because of the introduced security risk. Instead, see the Deployment chapter for advice on reducing session overheads.
The
passwordfield of thedb.auth_usertable defaults to aCRYPTvalidator, which needs anhmac_key. On legacy web2py applications you may see an extra argument passed to the Auth constructor:hmac_key = Auth.get_or_create_key(). The latter is a function that read the HMAC key from a file "private/auth.key" within the application folder. If the file does not exist it creates a randomhmac_key. If multiple apps share the same auth database, make sure they also use the samehmac_key. This is no longer necessary for new applications since passwords are salted with an individual random salt.
If multiple apps share the same auth database you may want to disable migrations: auth.define_tables(migrate=False).
To expose Auth, you also need the following function in a controller (for example in "default.py"):
def user(): return dict(form=auth())
The
authobject and theuseraction are already defined in the scaffolding application.
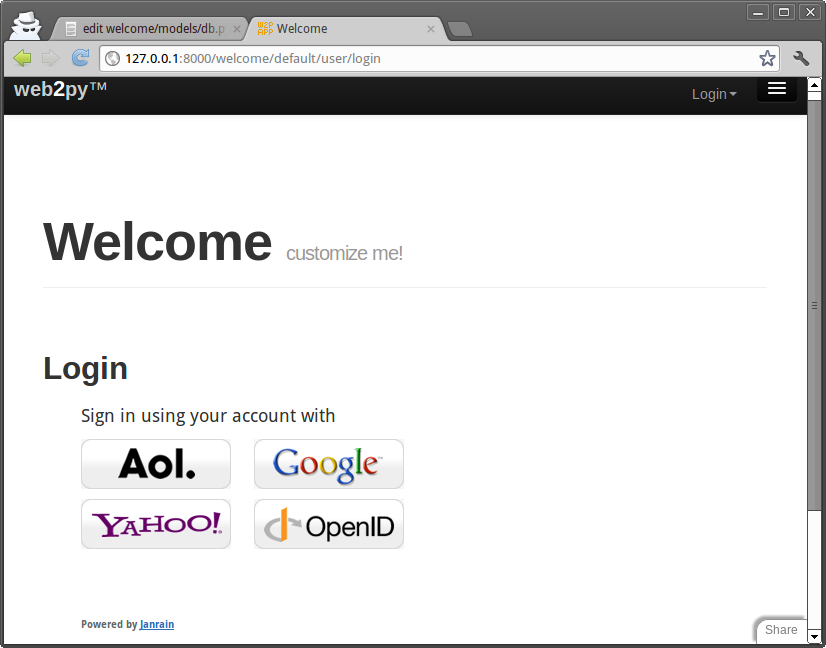
web2py also includes a sample view "welcome/views/default/user.html" to render this function properly that looks like this:
{{extend 'layout.html'}}
<h2>{{=T( request.args(0).replace('_', ' ').capitalize() )}}</h2>
<div id="web2py_user_form">
  {{=form}}
  {{if request.args(0)=='login':}}
    {{if not 'register' in auth.settings.actions_disabled:}}
      <br/><a href="{{=URL(args='register')}}">register</a>
    {{pass}}
    {{if not 'request_reset_password' in auth.settings.actions_disabled:}}
      <br/>
      <a href="{{=URL(args='request_reset_password')}}">lost password</a>
    {{pass}}
  {{pass}}
</div>
Notice that this function simply displays a form and therefore it can be customized using normal custom form syntax. The only caveat is that the form displayed by form=auth() depends on request.args(0); therefore, if you replace the default auth() login form with a custom login form, you may need an if statement like this in the view:
{{if request.args(0)=='login':}}...custom login form...{{pass}}
The controller above exposes multiple actions:
http://.../[app]/default/user/register
http://.../[app]/default/user/login
http://.../[app]/default/user/logout
http://.../[app]/default/user/profile
http://.../[app]/default/user/change_password
http://.../[app]/default/user/verify_email
http://.../[app]/default/user/retrieve_username
http://.../[app]/default/user/request_reset_password
http://.../[app]/default/user/reset_password
http://.../[app]/default/user/impersonate
http://.../[app]/default/user/groups
http://.../[app]/default/user/not_authorized
- register allows users to register. It is integrated with CAPTCHA, although this is disabled by default. This is also integrated with a client-side entropy calculator defined in "web2py.js". The calculator indicates the strength of the new password. You can use the
IS_STRONGvalidator to prevent web2py from accepting weak passwords. - login allows users who are registered to log in (if the registration is verified or does not require verification, if it has been approved or does not require approval, and if it has not been blocked).
- logout does what you would expect but also, as the other methods, logs the event and can be used to trigger some event.
- profile allows users to edit their profile, i.e. the content of the
auth_usertable. Notice that this table does not have a fixed structure and can be customized. - change_password allows users to change their password in a fail-safe way.
- verify_email. If email verification is turned on, then visitors, upon registration, receive an email with a link to verify their email information. The link points to this action.
- retrieve_username. By default, Auth uses email and password for login, but it can, optionally, use username instead of email. In this latter case, if a user forgets his/her username, the
retrieve_usernamemethod allows the user to type the email address and retrieve the username by email. - request_reset_password. Allows users who forgot their password to request a new password. They will get a confirmation email pointing to reset_password.
- impersonate allows a user to "impersonate" another user. This is important for debugging and for support purposes.
request.args[0]is the id of the user to be impersonated. This is only allowed if the logged in userhas_permission('impersonate', db.auth_user, user_id). You can useauth.is_impersonating()to check is the current user is impersonating somebody else. - groups lists the groups of which the current logged in user is a member.
- not_authorized displays an error message when the visitor tried to do something that he/she is not authorized to do
- navbar is a helper that generates a bar with login/register/etc. links.
Logout, profile, change_password, impersonate, and groups require login.
By default they are all exposed, but it is possible to restrict access to only some of these actions.
All of the methods above can be extended or replaced by subclassing Auth.
All of the methods above can be used in separate actions. For example:
def mylogin(): return dict(form=auth.login())
def myregister(): return dict(form=auth.register())
def myprofile(): return dict(form=auth.profile())
...
To restrict access to functions to only logged in visitors, decorate the function as in the following example
@auth.requires_login()
def hello():
    return dict(message='hello %(first_name)s' % auth.user)
Any function can be decorated, not just exposed actions. Of course this is still only a very simple example of access control. More complex examples will be discussed later.
auth.user_groups.
auth.usercontains a copy of thedb.auth_userrecords for the current logged in user orNoneotherwise. There is also aauth.user_idwhich is the same asauth.user.id(i.e. the id of the current logger in user) orNone. Similarly,auth.user_groupscontains a dictionary where each key is the id of a group of with the current logged in user is member of, the value is the corresponding group role.
The auth.requires_login() decorator as well as the other auth.requires_* decorators take an optional otherwise argument. It can be set to a string where to redirect the user if registration files or to a callable object. It is called if registration fails.
Restrictions on registration
If you want to allow visitors to register but not to log in until registration has been approved by the administrator:
auth.settings.registration_requires_approval = True
You can approve a registration via the appadmin interface. Look into the table auth_user. Pending registrations have a registration_key field set to "pending". A registration is approved when this field is set to blank.
Via the appadmin interface, you can also block a user from logging in. Locate the user in the table auth_user and set the registration_key to "blocked". "blocked" users are not allowed to log in. Notice that this will prevent a visitor from logging in but it will not force a visitor who is already logged in to log out. The word "disabled" may be used instead of "blocked" if preferred, with exactly the same behavior.
You can also block access to the "register" page completely with this statement:
auth.settings.actions_disabled.append('register')
If you want to allow people to register and automatically log them in after registration but still want to send an email for verification so that they cannot login again after logout, unless they completed the instructions in the email, you can accomplish it as follows:
auth.settings.registration_requires_verification = True
auth.settings.login_after_registration = True
Other methods of Auth can be restricted in the same way.
Integration with OpenID, Facebook, etc.
You can use the web2py Role Base Access Control and authenticate with other services like OpenID, Facebook, LinkedIn, Google, Dropbox, MySpace, Flickr, etc. The easiest way is to use Janrain Engage (formerly RPX) (Janrain.com).
Dropbox is discussed as a special case in Chapter 14 since it allows more than just login, it also provides storage services for the logged in users.
Janrain Engage is a service that provides middleware authentication. You can register with Janrain.com, register a domain (the name of your app) and set of URLs you will be using, and they will provide you with an API key.
Now edit the model of your web2py application and place the following lines somewhere after the definition of the auth object :
from gluon.contrib.login_methods.rpx_account import RPXAccount
auth.settings.actions_disabled=['register', 'change_password', 'request_reset_password']
auth.settings.login_form = RPXAccount(request,
    api_key='...',
    domain='...',
    url = "http://your-external-address/%s/default/user/login" % request.application)
The first line imports the new login method, the second line disables local registration, and the third line asks web2py to use the RPX login method. You must insert your own api_key provided by Janrain.com, the domain you choose upon registration and the external url of your login page. To obtain then login at janrain.com, then go to [Deployment][Application Settings]. On the right side there is the "Application Info", The api_key is called "API Key (Secret)".
The domain is the "Application Domain" without leading "https://" and without the trailing ".rpxnow.com/" For example: if you have registered a website as "secure.mywebsite.org", Janrain turns it to the Application Domain "https://secure-mywebsite.rpxnow.com".
When a new user logins for the first time, web2py creates a new db.auth_user record associated to the user. It will use the registration_id field to store a unique id for the user. Most authentication methods will also provide a username, email, first_name and last_name but that is not guaranteed. Which fields are provided depends on the login method selected by the user. If the same user logs in twice using different authentication mechanisms (for example once with OpenID and once with Facebook), Janrain may not recognize his/her as the same user and issue different registration_id.
You can customize the mapping between the data provided by Janrain and the data stored in db.auth_user. Here is an example for Facebook:
auth.settings.login_form.mappings.Facebook = lambda profile:            dict(registration_id = profile["identifier"],
                 username = profile["preferredUsername"],
                 email = profile["email"],
                 first_name = profile["name"]["givenName"],
                 last_name = profile["name"]["familyName"])
The keys in the dictionary are fields in db.auth_user and the values are data entries in the profile object provided by Janrain. Look at the online Janrain documentation for details on the latter.
Janrain will also keep statistics about your users' login.
This login form is fully integrated with web2py Role Based Access Control and you can still create groups, make users members of groups, assign permissions, block users, etc.
Janrain's free Basic service allows up to 2500 unique registered users to sign in annually. Accommodating more users requires an upgrade to one of their paid service tiers.
If you prefer not to use Janrain and want to use a different login method (LDAP, PAM, Google, OpenID, OAuth/Facebook, LinkedIn, etc.) you can do so. The API to do so is described later in the chapter.
CAPTCHA and reCAPTCHA
This is what you need to do to use reCAPTCHA:
- Register with reCAPTCHA[recaptcha] V2 and obtain a (PUBLIC_KEY, PRIVATE_KEY) couple for your account. These are just two strings.
- Append the following code to your model after the
authobject is defined:
from gluon.tools import Recaptcha2
auth.settings.captcha = Recaptcha2(request,
    'PUBLIC_KEY', 'PRIVATE_KEY')
reCAPTCHA may not work if you access the web site as 'localhost' or '127.0.0.1', because it is registered to work with publicly visible web sites only, unless you add them to the domains in the reCAPTCHA admin panel.
The Recaptcha2 constructor takes some optional arguments:
Recaptcha2(..., error_message='invalid', label='Verify:', options={})
There is an experimental argument, ajax=True, which uses the ajax API to recaptcha. It can be used with any recaptcha, but it was specifically added to allow recpatcha fields to work in LOAD forms (see Chapter 12 for more about LOAD, which allows web2py to 'plugin' components of a page with ajax ). It's experimental because it may be replaced with automatic detection of when ajax is required.
options may be a configuration dictionary, e.g. options={theme: 'white', size: 'normal'}
More details: reCAPTCHA[recaptchagoogle] and configuration.
If you do not want to use reCAPTCHA, look into the definition of the Recaptcha2 class in "gluon/tools.py", since it is easy to use other CAPTCHA systems.
Notice that Recaptcha2 is just a helper that extends DIV. It generates a dummy field that validates using the reCaptcha service and, therefore, it can be used in any form, including used defined FORMs:
form = FORM(INPUT(...), Recaptcha2(...), INPUT(_type='submit'))
You can use it in all types of SQLFORM by injection:
form = SQLFORM(...) or SQLFORM.factory(...)
form.insert(-1, TR('', Recaptcha2(...), ''))
Customizing Auth
The call to
auth.define_tables()
defines all Auth tables that have not been defined already. This means that if you wish to do so, you can define your own auth_user table.
There are a number of ways to customize auth. The simplest way is to add extra fields:
## after auth = Auth(db)
auth.settings.extra_fields['auth_user']= [
  Field('address'),
  Field('city'),
  Field('zip'),
  Field('phone')]
## before auth.define_tables(username=True)
You can declare extra fields not just for table "auth_user" but also for other "auth_" tables. Using extra_fields is the recommended way as it will not break any internal mechanism.
Another way to do this, although not really recommended, consists of defining your auth tables yourself. If a table is declared before auth.define_tables() it is used instead of the default one. Here is how to do it:
## after auth = Auth(db)
db.define_table(
    auth.settings.table_user_name,
    Field('first_name', length=128, default=''),
    Field('last_name', length=128, default=''),
    Field('email', length=128, default='', unique=True), # required
    Field('password', 'password', length=512,            # required
          readable=False, label='Password'),
    Field('address'),
    Field('city'),
    Field('zip'),
    Field('phone'),
    Field('registration_key', length=512,                # required
          writable=False, readable=False, default=''),
    Field('reset_password_key', length=512,              # required
          writable=False, readable=False, default=''),
    Field('registration_id', length=512,                 # required
          writable=False, readable=False, default=''))

## do not forget validators
custom_auth_table = db[auth.settings.table_user_name] # get the custom_auth_table
custom_auth_table.first_name.requires =   IS_NOT_EMPTY(error_message=auth.messages.is_empty)
custom_auth_table.last_name.requires =   IS_NOT_EMPTY(error_message=auth.messages.is_empty)
custom_auth_table.password.requires = [IS_STRONG(), CRYPT()]
custom_auth_table.email.requires = [
  IS_EMAIL(error_message=auth.messages.invalid_email),
  IS_NOT_IN_DB(db, custom_auth_table.email)]

auth.settings.table_user = custom_auth_table # tell auth to use custom_auth_table

## before auth.define_tables()
You can add any field you wish, and you can change validators but you cannot remove the fields marked as "required" in this example.
It is important to make "password", "registration_key", "reset_password_key" and "registration_id" fields readable=False and writable=False, since a visitor must not be allowed to tamper with them.
If you add a field called "username", it will be used in place of "email" for login. If you do, you will need to add a validator as well:
auth_table.username.requires = IS_NOT_IN_DB(db, auth_table.username)
Note that Auth caches the logged in user in the session and that's what you get in auth.user, so you need to clear the sessions for the extra fields changes to be reflected in it.
Renaming Auth tables
[renaming_auth_tables]
The actual names of the Auth tables are stored in
auth.settings.table_user_name = 'auth_user'
auth.settings.table_group_name = 'auth_group'
auth.settings.table_membership_name = 'auth_membership'
auth.settings.table_permission_name = 'auth_permission'
auth.settings.table_event_name = 'auth_event'
The names of the table can be changed by reassigning the above variables after the auth object is defined and before the Auth tables are defined. For example:
auth = Auth(db)
auth.settings.table_user_name = 'person'
#...
auth.define_tables()
The actual tables can also be referenced, independently of their actual names, by
auth.settings.table_user
auth.settings.table_group
auth.settings.table_membership
auth.settings.table_permission
auth.settings.table_event
Note: auth.signature gets defined when Auth is initialized, which is before you have set the custom table names. To avoid this do:
auth = Auth(db, signature=False)In that case, auth.signature will instead be defined when you call auth.define_tables(), by which point the custom tables names will already be set.
Other login methods and login forms
Auth provides multiple login methods and hooks to create new login methods. Each supported login method corresponds to a file in the folder
gluon/contrib/login_methods/
Refer to the documentation in the files themselves for each login method, but here are some examples.
First of all, we need to make a distinction between two types of alternate login methods:
- login methods that use a web2py login form (although the credentials are verified outside web2py). An example is LDAP.
- login methods that require an external single-sign-on form (an example is Google and Facebook).
In the latter case, web2py never gets the login credentials, only a login token issued by the service provider. The token is stored in db.auth_user.registration_id.
Let's consider examples of the first case:
Basic
Let's say you have an authentication service, for example at the url
https://basic.example.com
that accepts basic access authentication. That means the server accepts HTTP requests with a header of the form:
GET /index.html HTTP/1.0
Host: basic.example.com
Authorization: Basic QWxhZGRpbjpvcGVuIHNlc2FtZQ==
where the latter string is the base64 encoding of the string username:password. The service responds 200 OK if the user is authorized and 400, 401, 402, 403 or 404 otherwise.
You want to enter username and password using the standard Auth login form and verify the credentials against such a service. All you need to do is add the following code to your application
from gluon.contrib.login_methods.basic_auth import basic_auth
auth.settings.login_methods.append(
    basic_auth('https://basic.example.com'))
Notice that auth.settings.login_methods is a list of authentication methods that are executed sequentially. By default it is set to
auth.settings.login_methods = [auth]
When an alternate method is appended, for example basic_auth, Auth first tries to log in the visitor based on the content of auth_user, and when this fails, it tries the next method in the list. If a method succeeds in logging in the visitor, and if auth.settings.login_methods[0]==auth, Auth takes the following actions:
- if the user does not exist in
auth_user, a new user is created and the username/email and passwords are stored. - if the user does exist in
auth_userbut the new accepted password does not match the old stored password, the old password is replaced with the new one (notice that passwords are always stored hashed unless specified otherwise).
If you do not wish to store the new password in auth_user, then it is sufficient to change the order of login methods, or remove auth from the list. For example:
from gluon.contrib.login_methods.basic_auth import basic_auth
auth.settings.login_methods =     [basic_auth('https://basic.example.com')]
The same applies for any other login method described here.
SMTP and Gmail
You can verify login credentials using a remote SMTP server, for example Gmail; i.e., you log the user in if the email and password they provide are valid credentials to access the Gmail SMTP server (smtp.gmail.com:587). All that is needed is the following code:
from gluon.contrib.login_methods.email_auth import email_auth
auth.settings.login_methods.append(
    email_auth("smtp.gmail.com:587", "@gmail.com"))
The first argument of email_auth is the address:port of the SMTP server. The second argument is the email domain.
This works with any SMTP server that requires TLS authentication.
PAM
Authentication using Pluggable Authentication Modules (PAM) works as in the previous cases. It allows web2py to authenticate users using the operating system accounts:
from gluon.contrib.login_methods.pam_auth import pam_auth
auth.settings.login_methods.append(pam_auth())
LDAP
Authentication using LDAP works very much as in the previous cases.
To use LDAP login with MS Active Directory:
from gluon.contrib.login_methods.ldap_auth import ldap_auth
auth.settings.login_methods.append(ldap_auth(mode='ad',
   server='my.domain.controller',
   base_dn='ou=Users,dc=domain,dc=com'))
To use LDAP login with Lotus Notes and Domino:
auth.settings.login_methods.append(ldap_auth(mode='domino',
   server='my.domino.server'))
To use LDAP login with OpenLDAP (with UID):
auth.settings.login_methods.append(ldap_auth(server='my.ldap.server',
   base_dn='ou=Users,dc=domain,dc=com'))
To use LDAP login with OpenLDAP (with CN):
auth.settings.login_methods.append(ldap_auth(mode='cn',
   server='my.ldap.server', base_dn='ou=Users,dc=domain,dc=com'))
There are additional parameters to let web2py
- read additional data like the username from LDAP
- implement group control
- restrict login access.
See the documentation of ldap_auth in web2py/gluon/contrib/login_methods/ldap_auth.py.
Google App Engine
Authentication using Google when running on Google App Engine requires skipping the web2py login form, being redirected to the Google login page, and back upon success. Because the behavior is different than in the previous examples, the API is a little different.
from gluon.contrib.login_methods.gae_google_login import GaeGoogleAccount
auth.settings.login_form = GaeGoogleAccount()
OpenID
We have previously discussed integration with Janrain (which has OpenID support) and that is the easiest way to use OpenID. Yet sometimes you do not want to rely on a third party service and you want to access the OpenID provider directly from the consumer (your app).
Here is an example:
from gluon.contrib.login_methods.openid_auth import OpenIDAuth
auth.settings.login_form = OpenIDAuth(auth)
OpenIDAuth requires the python-openid module to be installed separately. Under the hood, this login method defines the following table:
db.define_table('alt_logins',
    Field('username', length=512, default=''),
    Field('type', length =128, default='openid', readable=False),
    Field('user', self.table_user, readable=False))
which stores the openid usernames for each user. If you want to display the openids for the current logged in user:
{{=auth.settings.login_form.list_user_openids()}}
OAuth2.0
We have previously discussed integration with Janrain, yet sometimes you do not want to rely on a third party service and you want to access a OAuth2.0 provider directly; for example, Facebook, Linkedin, Twitter, Google all of them provide an OAuth2.0 authentication service. web2py handles the OAuth2.0 flow transparently so that a user can be verified against any configured OAuth2.0 provider during login. Other than authentication an OAuth2.0 provider can grant to any web2py application access to user resources with restricted access thought a proprietary API. Google, Twitter, Facebook and so on, all have APIs that can be easily accessed by a web2py application.
It must be underlined that OAuth2.0 is limited only to authentication and authorization (for instance CAS has more functionalities), this means that each OAuth2.0 provider has a different way to receive a unique id from their user database through one of their APIs. Specific methods are well explained on respective provider documentation, they usually consist in a very simple REST call. This is why for each OAuth2.0 provider there is the need to write a few lines of code.
Before writing any instructions in the application model a first step is needed for any provider: registering a new application; this is usually done on provider's site and is explained in provider's documentation.
There are a few things that needs to be known once there is the need to add a new OAuth2.0 provider to your application: 1. the Authorization URI; 2. the Token request URI; 3. the application identification token and secret received upon registration of the new application; 4. the permissions that the provider must grant to the web2py application, i.e. the "scope" (see the provider's documentation); 5. the API call to receive a UID of the authenticating user, as explained on providers documentation.
Point 1 to 4 are used to initialize the authorization endpoint used by web2py to communicate with the OAuth2.0 provider. The unique id is retrieved by web2py with a call to the get_user() method when needed during the login flow; this is where the API call of point 5 is needed.
These are the essential modification that need to be done in your model: a. import OAuthAccount class; b. define a derived OAuthClass implementation; c. override __init__() method of that class; d. override get_user() method of that class. e. instantiate the class with the data of points 1-4 of the above list;
Once the class is instantiated, and the user is authenticated, the web2py application can access the API of the provider any time by using the OAuth2.0 access token by calling the accessToken() method of that class.
What follows is an example of what can be used with Facebook. This is a basic example using Facebook Graph API, remind that, by writing a proper get_user() method, many different things can be done. The example shows how the OAuth2.0 access token can be used when calling the remote API of the provider.
First of all you must install the Facebook Python SDK.
Second, you need the following code in your model:
## Define oauth application id and secret.
FB_CLIENT_ID='xxx'
FB_CLIENT_SECRET="yyyy"

## import required modules
try:
    import json
except ImportError:
    from gluon.contrib import simplejson as json
from facebook import GraphAPI, GraphAPIError
from gluon.contrib.login_methods.oauth20_account import OAuthAccount


## extend the OAUthAccount class
class FaceBookAccount(OAuthAccount):
    """OAuth impl for FaceBook"""
    AUTH_URL="https://graph.facebook.com/oauth/authorize"
    TOKEN_URL="https://graph.facebook.com/oauth/access_token"

    def __init__(self):
        OAuthAccount.__init__(self, None, FB_CLIENT_ID, FB_CLIENT_SECRET,
                              self.AUTH_URL, self.TOKEN_URL,
                              scope='email,user_about_me,user_activities, user_birthday, user_education_history, user_groups, user_hometown, user_interests, user_likes, user_location, user_relationships, user_relationship_details, user_religion_politics, user_subscriptions, user_work_history, user_photos, user_status, user_videos, publish_actions, friends_hometown, friends_location,friends_photos',
                              state="auth_provider=facebook",
                              display='popup')
        self.graph = None

    def get_user(self):
        '''Returns the user using the Graph API.
        '''
        if not self.accessToken():
            return None

        if not self.graph:
            self.graph = GraphAPI((self.accessToken()))

        user = None
        try:
            user = self.graph.get_object("me")
        except GraphAPIError, e:
            session.token = None
            self.graph = None

        if user:
            if not user.has_key('username'):
                username = user['id']
            else:
                username = user['username']

            if not user.has_key('email'):
                email = '%s.fakemail' %(user['id'])
            else:
                email = user['email']

            return dict(first_name = user['first_name'],
                        last_name = user['last_name'],
                        username = username,
                        email = '%s' %(email) )

## use the above class to build a new login form
auth.settings.login_form=FaceBookAccount()
We have previously discussed integration with Janrain (which has LinkedIn support) and that is the easiest way to use OAuth. Yet sometime you do not want to rely on a third party service or you may want to access LinkedIn directly to get more information than Janrain provides.
Here is an example:
from gluon.contrib.login_methods.linkedin_account import LinkedInAccount
auth.settings.login_form=LinkedInAccount(request,KEY,SECRET,RETURN_URL)
LinkedInAccount requires the "python-linkedin" module installed separately.
X509
You can also login by passing to the page an x509 certificate and your credential will be extracted from the certificate. This requires M2Crypto installed from
http://chandlerproject.org/bin/view/Projects/MeTooCryptoOnce you have M2Cryption installed you can do:
from gluon.contrib.login_methods.x509_auth import X509Account
auth.settings.actions_disabled=['register', 'change_password', 'request_reset_password']
auth.settings.login_form = X509Account()
You can now authenticate into web2py passing your x509 certificate. How to do this is browser-dependent, but probably you are more likely to use certificates for web services. In this case you can use for example cURL to try out your authentication:
curl -d "firstName=John&lastName=Smith" -G -v --key private.key --cert server.crt https://example/app/default/user/profileThis works out of the box with Rocket (the web2py built-in web server) but you may need some extra configuration work on the web server side if you are using a different web server. In particular you need to tell your web server where the certificates are located on local host and that it needs to verify certificates coming from the clients. How to do it is web server dependent and therefore omitted here.
Multiple login forms
Some login methods modify the login_form, some do not. When they do that, they may not be able to coexist. Yet some coexist by providing multiple login forms in the same page. web2py provides a way to do it. Here is an example mixing normal login (auth) and RPX login (janrain.com):
from gluon.contrib.login_methods.extended_login_form import ExtendedLoginForm
other_form = RPXAccount(request, api_key='...', domain='...', url='...')
auth.settings.login_form = ExtendedLoginForm(auth, other_form, signals=['token'])
If signals are set and a parameter in request matches any signals, it will return the call of other_form.login_form instead. other_form can handle some particular situations, for example, multiple steps of OpenID login inside other_form.login_form.
Otherwise it will render the normal login form together with the other_form.
Record versioning
You can use Auth to enable full record versioning:
auth.enable_record_versioning(db,
    archive_db=None,
    archive_names='%(tablename)s_archive',
    current_record='current_record'):
This tells web2py to create an archive table for each of the tables in db and store a copy of each record when modified. The old copy is stored. The new copy is not.
The last three parameters are optional:
archive_dballows to specify another database where the archive tables are to be stored. Setting it toNoneis the same as setting it todb.archive_namesprovides a pattern for naming each archive table.current_recordspecified the name of the reference field to be used in the archive table to refer to the original, unmodified, record. Notice thatarchive_db!=dbthen the reference field is just an integer field since cross database references are not possible.
Only tables with modified_by and modified_on fields (as created for example by auth.signature) will be archived.
When you enable_record_versioning, if records have an is_active field (also created by auth.signature), records will never be deleted but they will be marked with is_active=False. In fact, enable_record_versioning adds a common_filter to every versioned table that filters out records with is_active=False so they essentially become invisible.
If you enable_record_versioning, you should not use auth.archive or crud.archive else you will end up with duplicate records. Those functions do explicitly what enable_record_versioning does automatically and they will be deprecated.
Mail and Auth
You can read more about web2py API for emails and email configuration in Chapter 8. Here we limit the discussion to the interaction between Mail and Auth.
Define a mailer with
from gluon.tools import Mail
mail = Mail()
mail.settings.server = 'smtp.example.com:25'
mail.settings.sender = 'you@example.com'
mail.settings.login = 'username:password'
or simply use the mailer provided by auth:
mail = auth.settings.mailer
mail.settings.server = 'smtp.example.com:25'
mail.settings.sender = 'you@example.com'
mail.settings.login = 'username:password'
You need to replace the mail.settings with the proper parameters for your SMTP server. Set mail.settings.login = None if the SMTP server does not require authentication. If you don't want to use TLS, set mail.settings.tls = False
In Auth, by default, email verification is disabled. To enable email, append the following lines in the model where auth is defined:
auth.settings.registration_requires_verification = True
auth.settings.registration_requires_approval = False
auth.settings.reset_password_requires_verification = True
auth.messages.verify_email = 'Click on the link %(link)s to verify your email'
auth.messages.reset_password = 'Click on the link %(link)s to reset your password'
In the two auth.messages above, you may need to replace the URL portion of the string with the proper complete URL of the action. This is necessary because web2py may be installed behind a proxy, and it cannot determine its own public URLs with absolute certainty. The above examples (which are the default values) should, however, work in most cases.
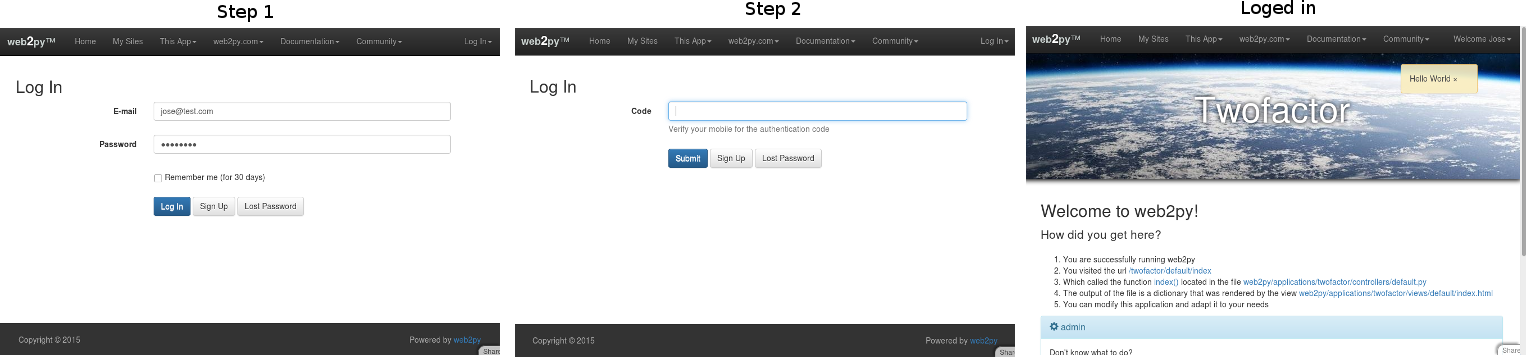
Two-step verification
Two-step verification (or Two-factor authentication) is a way of improving authentication security. The setting adds an extra step in the login process. In the first step, users are shown the standard username/password form. If they successfully pass this challenge by submitting the correct username and password, and two-factor authentication is enabled for the user, the server will present a second form before logging them in.
This functionality can be enabled on a per-user basis:
This case is a good example for apps where users can enable/disable two-factor authentication by them self.
This form will ask users for a six-digit code that has been emailed to their accounts (the server emails the code if the username and password was correct). By default the user will 3 attempts to introduce the code. If the code is incorrect after 3 attempts, the second verification step is treated as having failed and the user must complete the first challenge (username/password) again.
- Create a group (also known as a role) for the two-step verification. In this example it will be called
auth2stepand the description may beTwo-step verification. - Give a user membership of this role.
- Add the following setting in the model where you created and configured your auth object (probably in the model db.py):
auth.settings.two_factor_authentication_group = "auth2step"
- Don’t forget to configure the email server in db.py
This functionality can be enabled for the entire app:
This form will ask users for a six-digit code that has been emailed to their accounts (the server emails the code if the username and password was correct). By default the user will 3 attempts to introduce the code. If the code is incorrect after 3 attempts, the second verification step is treated as having failed and the user must complete the first challenge (username/password) again.
auth.settings.auth_two_factor_enabled = True
This case will effect over all the user in the application. For example, if your office IP is 93.56.854.54 and you don't want two-factor authentication from your office IP. In your models:
if request.env.remote_addr != '93.56.854.54':
    auth.settings.auth_two_factor_enabled = True
Other options that can be applied over the examples before:
Example 1: If you want to send the code by SMS instead of email. In your models write:
def _sendsms(user, auth_two_factor):
    #write the process to send the auth_two_factor code by SMS
    return  auth_two_factor

auth.settings.auth_two_factor_enabled = True
auth.messages.two_factor_comment = "Your code have been sent by SMS"
auth.settings.two_factor_methods = [lambda user, auth_two_factor: _sendsms(user, auth_two_factor)]
For def _sendsms(...) receive two values: user and auth_two_factor:
- user: it is a row with all his parameters. You can access them: user.email, user.first_name, etc.
- auth_two_factor: string that contains the authentication code.
Note that in case you want to send an SMS, you will need to add extra field, for example phone in your user table. In this case you can access to the phone field as user.phone. More info how to send an SMS with web2py Emails-and-SMS
Example 2: If you want to send the code by SMS and create or own code:
def _sendsms(user, auth_two_factor):
    auth_two_factor = #write your own  algorithm to generate the code.
    #write the process to send the auth_two_factor code by SMS
    return  auth_two_factor

auth.settings.two_factor_methods = [lambda user, auth_two_factor: _sendsms(user, auth_two_factor)]
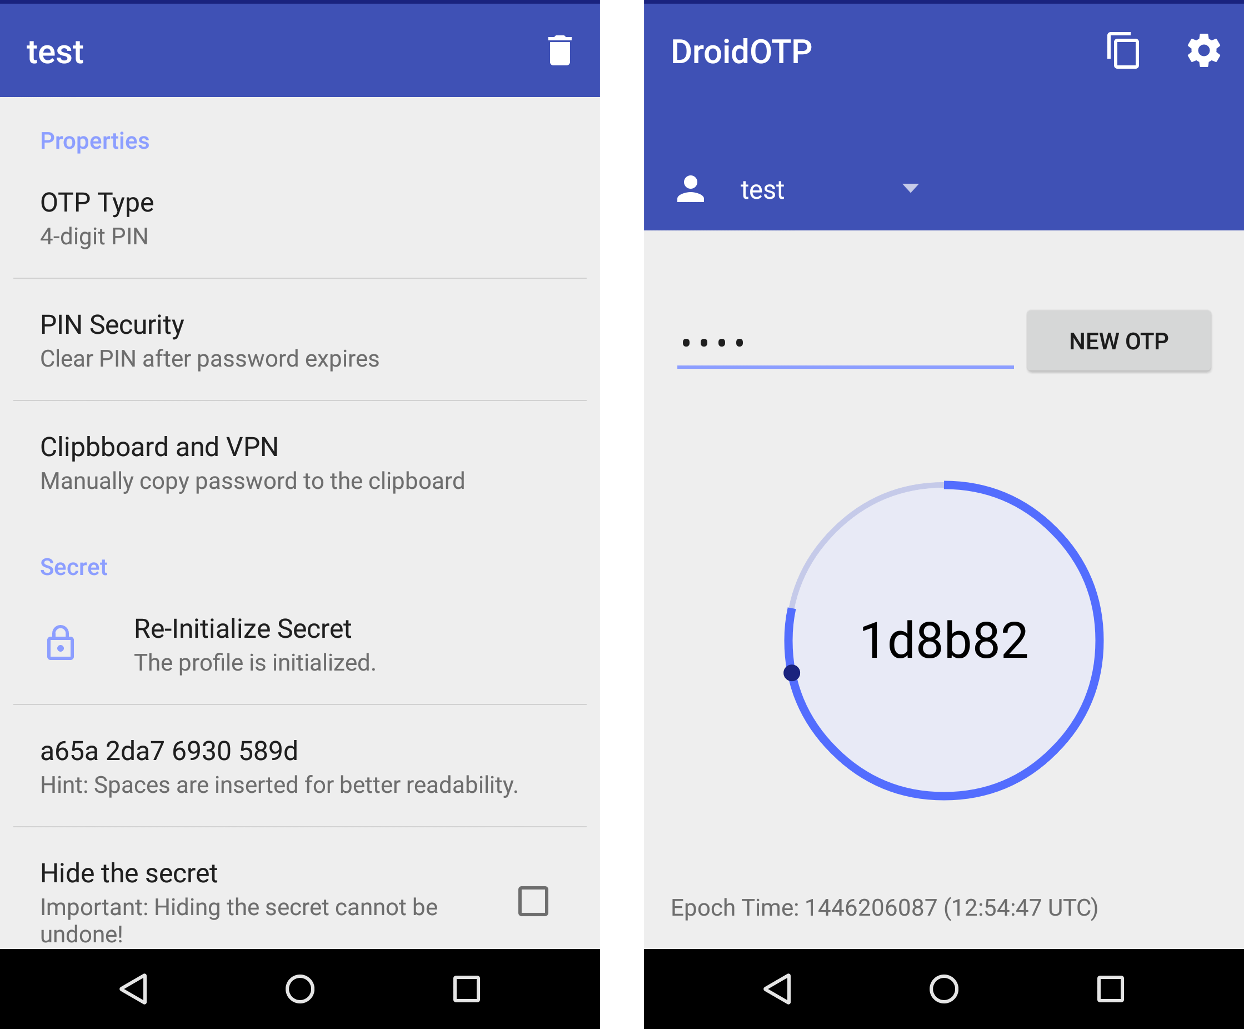
Example 3: The code is generated by a external client. For example Mobile OTP Client:
MOTP (Mobile one time password) allows you to login with a one time password (OTP) generated on a motp client, motp clients are available for practically all platforms. To know more about OTP visit wiki-One-time-password to know more visit MOTP
For the next example we will use DroidOTP. It is a free app and it can be found in Play Store for Android. Once you have installed:
- Create a new profile, for example
test - Initialize a secret key shaking your phone.
In your models copy and paste:
#Before define tables, we add some extra field to auth_user
auth.settings.extra_fields['auth_user'] = [
    Field('motp_secret', 'password', length=512, default='', label='MOTP Secret'),
    Field('motp_pin', 'string', length=128, default='', label='MOTP PIN')]

OFFSET = 60 #Be sure is the same in your OTP Client

#Set session.auth_two_factor to None. Because the code is generated by external app.
# This will avoid to use the default setting and send a code by email.
def _set_two_factor(user, auth_two_factor):
    return None

def verify_otp(user, otp):
  import time
  from hashlib import md5
  epoch_time = int(time.time())
  time_start = int(str(epoch_time - OFFSET)[:-1])
  time_end = int(str(epoch_time + OFFSET)[:-1])
  for t in range(time_start - 1, time_end + 1):
     to_hash = str(t) + user.motp_secret + user.motp_pin
     hash = md5(to_hash).hexdigest()[:6]
     if otp == hash:
       return hash

auth.settings.auth_two_factor_enabled = True
auth.messages.two_factor_comment = "Verify your OTP Client for the code."
auth.settings.two_factor_methods = [lambda user, auth_two_factor: _set_two_factor(user, auth_two_factor)]
auth.settings.two_factor_onvalidation = [lambda user, otp: verify_otp(user, otp)]
The secret key generated before with your phone need to be introduced into motp_secret field. The secret should be not reused, for security reasons. Choose one PIN. It can be numbers, letters or a mix. Go to your phone, choose your profile and type the PIN you have introduced before in the form. You got the authenticator code to use in your app!!
Note that for this way of two-factor authentication phone and server (where web2py app is hosted) need to be synchronized (on time). They can be in a different time zone. This is because the OTP use Unix time stamp. It tracks the time as a running total of seconds.
Some extra parameters for configuration:
Set your custom attempts to login:
auth.setting.auth_two_factor_tries_left = 3
Message to return in case the code is incorrect:
auth.messages.invalid_two_factor_code = 'Incorrect code. {0} more attempt(s) remaining.'
To customize the email template:
auth.messages.retrieve_two_factor_code='Your temporary login code is {0}'
auth.messages.retrieve_two_factor_code_subject='Your temporary login code is {0}'
To customize two-factor form:
auth.messages.label_two_factor = 'Authentication code'
auth.messages.two_factor_comment = 'The code was emailed to you and is required for login.'
Authorization
Once a new user is registered, a new group is created to contain the user. The role of the new user is conventionally "user_[id]" where [id] is the id of the newly created user. The creation of the group can be disabled with
auth.settings.create_user_groups = None
although we do not suggest doing so. Notice that create_user_groups is not a boolean (although it can be False) but it defaults to:
auth.settings.create_user_groups="user_%(id)s"
It store a template for the name of the group created for user id.
Users have membership in groups. Each group is identified by a name/role. Groups have permissions. Users have permissions because of the groups they belong to. By default each user is made member of their own group.
You can also do
auth.settings.everybody_group_id = 5
to make any new user automatically member of group number 5. Here 5 is used as an example and we assume the group was created already.
You can create groups, give membership and permissions via appadmin or programmatically using the following methods:
auth.add_group('role', 'description')
returns the id of the newly created group.
auth.del_group(group_id)
deletes the group with group_id.
auth.del_group(auth.id_group('user_7'))
deletes the group with role "user_7", i.e., the group uniquely associated to user number 7.
auth.user_group(user_id)
returns the id of the group uniquely associated to the user identified by user_id.
auth.add_membership(group_id, user_id)
gives user_id membership of the group group_id. If the user_id is not specified, then web2py assumes the current logged-in user.
auth.del_membership(group_id, user_id)
revokes user_id membership of the group group_id. If the user_id is not specified, then web2py assumes the current logged-in user.
auth.has_membership(group_id, user_id, role)
checks whether user_id has membership of the group group_id or the group with the specified role. Only group_id or role should be passed to the function, not both. If the user_id is not specified, then web2py assumes the current logged-in user.
NOTE: To avoid database query at each page load that use auth.has_membership, someone can use cached=True. If cached is set to True has_membership() check group_id or role only against auth.user_groups variable which is populated properly only at login time. This means that if an user membership change during a given session the user has to log off and log in again in order to auth.user_groups to be properly recreated and reflecting the user membership modification. There is one exception to this log off and log in process which is in case that the user change his own membership, in this case auth.user_groups can be properly update for the actual connected user because web2py has access to the proper session user_groups variable. To make use of this exception someone has to place an "auth.update_groups()" instruction in his app code to force auth.user_groups to be updated. As mention this will only work if it the user itself that change it membership not if another user, let say an administrator, change someone else's membership.
auth.add_permission(group_id, 'name', 'object', record_id)
gives permission "name" (user defined) on the object "object" (also user defined) to members of the group group_id. If "object" is a tablename then the permission can refer to the entire table by setting record_id to a value of zero, or the permission can refer to a specific record by specifying a record_id value greater than zero. When giving permissions on tables, it is common to use a permission name in the set ('create', 'read', 'update', 'delete', 'select') since these permissions are understood and can be enforced by the CRUD APIs.
If group_id is zero, web2py uses the group uniquely associated to the current logged-in user.
You can also use auth.id_group(role="...") to get the id of a group given its name.
auth.del_permission(group_id, 'name', 'object', record_id)
revokes the permission.
auth.has_permission('name', 'object', record_id, user_id)
checks whether the user identified by user_id has membership in a group with the requested permission.
rows = db(auth.accessible_query('read', db.mytable, user_id)) .select(db.mytable.ALL)
returns all rows of table "mytable" that user user_id has "read" permission on. If the user_id is not specified, then web2py assumes the current logged-in user. The accessible_query(...) can be combined with other queries to make more complex ones. accessible_query(...) is the only Auth method to require a JOIN, so it does not work on the Google App Engine.
Assuming the following definitions:
>>> from gluon.tools import Auth
>>> auth = Auth(db)
>>> auth.define_tables()
>>> secrets = db.define_table('secret_document', Field('body'))
>>> james_bond = db.auth_user.insert(first_name='James',
                                     last_name='Bond')
Here is an example:
>>> doc_id = db.secret_document.insert(body = 'top secret')
>>> agents = auth.add_group(role = 'Secret Agent')
>>> auth.add_membership(agents, james_bond)
>>> auth.add_permission(agents, 'read', secrets)
>>> print auth.has_permission('read', secrets, doc_id, james_bond)
True
>>> print auth.has_permission('update', secrets, doc_id, james_bond)
False
Decorators
The most common way to check permission is not by explicit calls to the above methods, but by decorating functions so that permissions are checked relative to the logged-in visitor. Here are some examples:
def function_one():
    return 'this is a public function'

@auth.requires_login()
def function_two():
    return 'this requires login'

@auth.requires_membership('agents')
def function_three():
    return 'you are a secret agent'

@auth.requires_permission('read', secrets)
def function_four():
    return 'you can read secret documents'

@auth.requires_permission('delete', 'any file')
def function_five():
    import os
    for file in os.listdir('./'):
        os.unlink(file)
    return 'all files deleted'

@auth.requires(auth.user_id==1 or request.client=='127.0.0.1', requires_login=True)
def function_six():
    return 'you can read secret documents'

@auth.requires_permission('add', 'number')
def add(a, b):
    return a + b

def function_seven():
    return add(3, 4)
The condition argument of @auth.requires(condition) can be a callable and unless the condition is simple, it better to pass a callable than a condition since this will be faster, as the condition will only be evaluated if needed. For example
@auth.requires(lambda: check_condition())
def action():
    ....
@auth.requires also takes an optional argument requires_login which defaults to True. If set to False, it does not require login before evaluating the condition as true/false. The condition can be a boolean value or a function evaluating to boolean.
Note that access to all functions apart from the first one is restricted based on permissions that the visitor may or may not have.
If the visitor is not logged in, then the permission cannot be checked; the visitor is redirected to the login page and then back to the page that requires permissions.
Combining requirements
Occasionally, it is necessary to combine requirements. This can be done via a generic requires decorator which takes a single argument, a true or false condition. For example, to give access to agents, but only on Tuesday:
@auth.requires(auth.has_membership(group_id='agents')               and request.now.weekday()==1)
def function_seven():
    return 'Hello agent, it must be Tuesday!'
or equivalently:
@auth.requires(auth.has_membership(role='Secret Agent')                and request.now.weekday()==1)
def function_seven():
    return 'Hello agent, it must be Tuesday!'
Authorization and CRUD
Using decorators and/or explicit checks provides one way to implement access control.
Another way to implement access control is to always use CRUD (as opposed to SQLFORM) to access the database and to ask CRUD to enforce access control on database tables and records. This is done by linking Auth and CRUD with the following statement:
crud.settings.auth = auth
This will prevent the visitor from accessing any of the CRUD functions unless the visitor is logged in and has explicit access. For example, to allow a visitor to post comments, but only update their own comments (assuming crud, auth and db.comment are defined):
def give_create_permission(form):
    group_id = auth.id_group('user_%s' % auth.user.id)
    auth.add_permission(group_id, 'read', db.comment)
    auth.add_permission(group_id, 'create', db.comment)
    auth.add_permission(group_id, 'select', db.comment)

def give_update_permission(form):
    comment_id = form.vars.id
    group_id = auth.id_group('user_%s' % auth.user.id)
    auth.add_permission(group_id, 'update', db.comment, comment_id)
    auth.add_permission(group_id, 'delete', db.comment, comment_id)

auth.settings.register_onaccept = give_create_permission
crud.settings.auth = auth

def post_comment():
   form = crud.create(db.comment, onaccept=give_update_permission)
   comments = db(db.comment).select()
   return dict(form=form, comments=comments)

def update_comment():
   form = crud.update(db.comment, request.args(0))
   return dict(form=form)
You can also select specific records (those you have 'read' access to):
def post_comment():
   form = crud.create(db.comment, onaccept=give_update_permission)
   query = auth.accessible_query('read', db.comment, auth.user.id)
   comments = db(query).select(db.comment.ALL)
   return dict(form=form, comments=comments)
The permissions names enforced by :
crud.settings.auth = auth
are "read", "create", "update", "delete", "select", "impersonate".
Authorization and downloads
The use of decorators and the use of crud.settings.auth do not enforce authorization on files downloaded by the usual download function
def download(): return response.download(request, db)
If one wishes to do so, one must declare explicitly which "upload" fields contain files that need access control upon download. For example:
db.define_table('dog',
   Field('small_image', 'upload'),
   Field('large_image', 'upload'))

db.dog.large_image.authorize = lambda record:    auth.is_logged_in() and    auth.has_permission('read', db.dog, record.id, auth.user.id)
The attribute authorize of upload field can be None (the default) or a function that decides whether the user is logged in and has permission to 'read' the current record. In this example, there is no restriction on downloading images linked by the "small_image" field, but we require access control on images linked by the "large_image" field.
Access Control and Basic Authentication
Occasionally, it may be necessary to expose actions that have decorators that require access control as services; i.e., to call them from a program or script and still be able to use authentication to check for authorization.
Auth enables login via basic authentication:
auth.settings.allow_basic_login = True
With this set, an action like
@auth.requires_login()
def give_me_time():
    import time
    return time.ctime()
can be called, for example, from a shell command:
wget --user=[username] --password=[password] --auth-no-challenge
    http://.../[app]/[controller]/give_me_time
It is also possible to log in by calling auth.basic() rather than using an @auth decorator:
def give_me_time():
    import time
    auth.basic()
    if auth.user:
        return time.ctime()
    else:
        return 'Not authorized'
Basic login is often the only option for services (described in the next chapter), but it is disabled by default.
Application Management via privileged users (Experimental)
Normally administrator functions such as defining users and groups are managed by the server administrator. However, you may want a group of privileged users to have administrator rights for a specific application. This is possible with versions after web2py v2.5.1 (Upgrading an existing application requires the new appadmin controller and the new appadmin.html view, copied from the welcome app. Also, apps created prior to web2py v2.6 need the new javascript file in welcome/static/js/web2py.js)
The concept allows different management settings, each of which allows a user group to edit a certain set of tables in this application.
Example: First, create a group (also known as a role) for your privileged users. In this example, it will be called admin. Give a user membership of this role. Second, think of a name to describe this management setting, such as db_admin.
Add the following setting in the model where you created and configured your auth object (probably in the model db):
auth.settings.manager_actions = dict(db_admin=dict(role='admin', heading='Manage Database', tables = db.tables))
A menu item has the URL like below, passing the management setting name as an arg:
URL('appadmin', 'manage', args=['db_admin'])
This URL appears as /appadmin/manage/auth.
Advanced use
This mechanism allows multiple management settings; each additional management setting is just another key defined in auth.settings.manager_actions.
For example, you may want a group of users (such as 'Super') to have access to every table in a management setting called "db_admin", and another group (such as 'Content Manager') to have admin access to tables relating to content in a management setting called "content_admin".
This can be set up like this:
auth.settings.manager_actions = dict(
    db_admin=dict(role='Super', heading='Manage Database', tables=db.tables),
    content_admin=dict(role='Content Manager', tables=[content_db.articles, content_db.recipes, content_db.comments])
    content_mgr_group_v2 = dict(role='Content Manager v2', db=content_db,
        tables=['articles', 'recipes', 'comments'],
        smartgrid_args=dict(
           DEFAULT=dict(maxtextlength=50, paginate=30),
           comments=dict(maxtextlength=100, editable=False)
        )
     )
(The heading key is optional. If missing, a smart default will be used)
You could then make two new menu items with these URLs:
URL('appadmin', 'manage', args=['db_admin'])
URL('appadmin', 'manage', args=['content_admin'])
The management setting called "content_mgr_group_v2" shows some more advanced possibilities. The key smartgrid_args is passed to the smartgrid used to edit or view the tables. Apart from the special key DEFAULT, table names are passed as keys (such as the table called "comments"). The syntax in this example names the tables as a list of strings, using the key db=content_db to specify the database.
Manual Authentication
Some times you want to implement your own logic and do "manual" user login. This can also be done by calling the function:
user = auth.login_bare(username, password)
login_bare returns user if the user exists and the password is valid, else it returns False. username is the email if the "auth_user" table does not have a "username" field.
Auth Settings and messages
Here is a list of all parameters that can be customized for Auth
The following must point to a gluon.tools.Mail object to allow auth to send emails:
auth.settings.mailer = None
Read more about setting up mail here: Mail and Auth
The following must be the name of the controller that defined the user action:
auth.settings.controller = 'default'
The following was a very important setting in older web2py versions:
auth.settings.hmac_key = None
Where it was set to something like "sha512:a-pass-phrase" and passed to the CRYPT validator for the "password" field of the auth_user table, providing the algorithm and a-pass-phrase used to hash the passwords. However, web2py no longers needs this setting because it handles this automatically.
By default, auth also requires a minimum password length of 4. This can be changed:
auth.settings.password_min_length = 4
To disable an action append its name to this list:
auth.settings.actions_disabled = []
For example:
auth.settings.actions_disabled.append('register')
will disable registration.
If you want to receive an email to verify registration set this to True:
auth.settings.registration_requires_verification = False
To automatically login people after registration, even if they have not completed the email verification process, set the following to True:
auth.settings.login_after_registration = False
If new registrants must wait for approval before being able to login set this to True:
auth.settings.registration_requires_approval = False
Approval consists of setting registration_key=='' via appadmin or programmatically.
If you do not want a new group for each new user set the following to False:
auth.settings.create_user_groups = True
The following settings determine alternative login methods and login forms, as discussed previously:
auth.settings.login_methods = [auth]
auth.settings.login_form = auth
Do you want to allow basic login?
auth.settings.allows_basic_login = False
The following is the URL of the login action:
auth.settings.login_url = URL('user', args='login')
If the user tried to access the register page but is already logged in, he will be redirected to this URL:
auth.settings.logged_url = URL('user', args='profile')
This must point to the URL of the download action, in case the profile contains images:
auth.settings.download_url = URL('download')
These must point to the URL you want to redirect your users to after the various possible auth actions (in case there is no referrer):
Note: If your app is based on the standard scaffold app Welcome, you use the auth.navbar. To get the settings below to take effect, you need to edit layout.html and set argument referrer_actions = None. auth.navbar(mode='dropdown', referrer_actions=None)
It is also possible to keep referrer_actions for some auth events. For example
auth.navbar(referrer_actions=['login', 'profile'])
If the default behavior is left unchanged, auth.navbar uses the _next URL parameter, and uses that to send the user back to the referring page. However, if navbar's default auto-referring behavior is changed, the settings below will take effect.
auth.settings.login_next = URL('index')
auth.settings.logout_next = URL('index')
auth.settings.profile_next = URL('index')
auth.settings.register_next = URL('user', args='login')
auth.settings.retrieve_username_next = URL('index')
auth.settings.retrieve_password_next = URL('index')
auth.settings.change_password_next = URL('index')
auth.settings.request_reset_password_next = URL('user', args='login')
auth.settings.reset_password_next = URL('user', args='login')
auth.settings.verify_email_next = URL('user', args='login')
If the visitor is not logger in, and calls a function that requires authentication, the user is redirected to auth.settings.login_url which defaults to URL('default', 'user/login'). One can replace this behavior by redefining:
auth.settings.on_failed_authentication = lambda url: redirect(url)
This is the function called for the redirection. The argument url` passed to this function is the url for the login page.
If the visitor does not have permission to access a given function, the visitor is redirect to the URL defined by
auth.settings.on_failed_authorization = URL('user', args='on_failed_authorization')
You can change this variable and redirect the user elsewhere.
Often on_failed_authorization is a URL but it can be a function that returns the URL and it will be called on failed authorization.
These are lists of callbacks that should be executed after form validation for each of the corresponding action before any database IO:
auth.settings.login_onvalidation = []
auth.settings.register_onvalidation = []
auth.settings.profile_onvalidation = []
auth.settings.retrieve_password_onvalidation = []
auth.settings.reset_password_onvalidation = []
Each callback must be a function that takes the form object and it can modify the attributes of the form object before database IO is performed.
These are lists of callbacks that should be executed after the database IO is performed and before redirection:
auth.settings.login_onaccept = []
auth.settings.register_onaccept = []
auth.settings.profile_onaccept = []
auth.settings.verify_email_onaccept = []
Here is an example:
auth.settings.register_onaccept.append(lambda form:   mail.send(to='you@example.com', subject='new user',
             message='new user email is %s'%form.vars.email))
You can enable captcha for any of the auth actions:
auth.settings.captcha = None
auth.settings.login_captcha = None
auth.settings.register_captcha = None
auth.settings.retrieve_username_captcha = None
auth.settings.retrieve_password_captcha = None
If the .captcha settings points to a gluon.tools.Recaptcha, all forms for which the corresponding option (like .login_captcha) is set to None will have a captcha, while those for which the corresponding option is set to False will not. If, instead, .captcha is set to None, only those form who have a corresponding option set to a gluon.tools.Recaptcha object will have captcha and the others will not.
This is the login session expiration time:
auth.settings.expiration = 3600 # seconds
You can change the name of the password field (in Firebird for example "password" is a keyword and cannot be used to name a field):
auth.settings.password_field = 'password'
Normally the login form tries to validate an email. This can be disabled by changing this setting:
auth.settings.login_email_validate = True
Do you want to show the record id in the edit profile page?
auth.settings.showid = False
For custom forms you may want to disable automatic error notification in forms:
auth.settings.hideerror = False
Also for custom forms you can change the style:
auth.settings.formstyle = 'table3cols'
(it can be "bootstrap3_inline", "table3cols", "table2cols", "divs" and "ul"; for all options, see gluon/sqlhtml.py)
And you can set the separator for auth-generated forms:
auth.settings.label_separator = ':'
By default the login form gives the option to extend the login via "remember me" option. The expiration time can be changed or the option disabled via these settings:
auth.settings.long_expiration = 3600*24*30 # one month
auth.settings.remember_me_form = True
You can also customize the following messages whose use and context should be obvious:
auth.messages.submit_button = 'Submit'
auth.messages.verify_password = 'Verify Password'
auth.messages.delete_label = 'Check to delete:'
auth.messages.function_disabled = 'Function disabled'
auth.messages.access_denied = 'Insufficient privileges'
auth.messages.registration_verifying = 'Registration needs verification'
auth.messages.registration_pending = 'Registration is pending approval'
auth.messages.login_disabled = 'Login disabled by administrator'
auth.messages.logged_in = 'Logged in'
auth.messages.email_sent = 'Email sent'
auth.messages.unable_to_send_email = 'Unable to send email'
auth.messages.email_verified = 'Email verified'
auth.messages.logged_out = 'Logged out'
auth.messages.registration_successful = 'Registration successful'
auth.messages.invalid_email = 'Invalid email'
auth.messages.unable_send_email = 'Unable to send email'
auth.messages.invalid_login = 'Invalid login'
auth.messages.invalid_user = 'Invalid user'
auth.messages.is_empty = "Cannot be empty"
auth.messages.mismatched_password = "Password fields don't match"
auth.messages.verify_email = ...
auth.messages.verify_email_subject = 'Password verify'
auth.messages.username_sent = 'Your username was emailed to you'
auth.messages.new_password_sent = 'A new password was emailed to you'
auth.messages.password_changed = 'Password changed'
auth.messages.retrieve_username = 'Your username is: %(username)s'
auth.messages.retrieve_username_subject = 'Username retrieve'
auth.messages.retrieve_password = 'Your password is: %(password)s'
auth.messages.retrieve_password_subject = 'Password retrieve'
auth.messages.reset_password = ...
auth.messages.reset_password_subject = 'Password reset'
auth.messages.invalid_reset_password = 'Invalid reset password'
auth.messages.profile_updated = 'Profile updated'
auth.messages.new_password = 'New password'
auth.messages.old_password = 'Old password'
auth.messages.group_description =     'Group uniquely assigned to user %(id)s'
auth.messages.register_log = 'User %(id)s Registered'
auth.messages.login_log = 'User %(id)s Logged-in'
auth.messages.logout_log = 'User %(id)s Logged-out'
auth.messages.profile_log = 'User %(id)s Profile updated'
auth.messages.verify_email_log = 'User %(id)s Verification email sent'
auth.messages.retrieve_username_log = 'User %(id)s Username retrieved'
auth.messages.retrieve_password_log = 'User %(id)s Password retrieved'
auth.messages.reset_password_log = 'User %(id)s Password reset'
auth.messages.change_password_log = 'User %(id)s Password changed'
auth.messages.add_group_log = 'Group %(group_id)s created'
auth.messages.del_group_log = 'Group %(group_id)s deleted'
auth.messages.add_membership_log = None
auth.messages.del_membership_log = None
auth.messages.has_membership_log = None
auth.messages.add_permission_log = None
auth.messages.del_permission_log = None
auth.messages.has_permission_log = None
auth.messages.label_first_name = 'First name'
auth.messages.label_last_name = 'Last name'
auth.messages.label_username = 'Username'
auth.messages.label_email = 'E-mail'
auth.messages.label_password = 'Password'
auth.messages.label_registration_key = 'Registration key'
auth.messages.label_reset_password_key = 'Reset Password key'
auth.messages.label_registration_id = 'Registration identifier'
auth.messages.label_role = 'Role'
auth.messages.label_description = 'Description'
auth.messages.label_user_id = 'User ID'
auth.messages.label_group_id = 'Group ID'
auth.messages.label_name = 'Name'
auth.messages.label_table_name = 'Table name'
auth.messages.label_record_id = 'Record ID'
auth.messages.label_time_stamp = 'Timestamp'
auth.messages.label_client_ip = 'Client IP'
auth.messages.label_origin = 'Origin'
auth.messages.label_remember_me = "Remember me (for 30 days)"
add|del|has membership logs allow the use of "%(user_id)s" and "%(group_id)s". add|del|has permission logs allow the use of "%(user_id)s", "%(name)s", "%(table_name)s", and "%(record_id)s".
Central Authentication Service
web2py provides support for third party authentication and single sign on. Here we discuss the Central Authentication Service (CAS) which is an industry standard and both client and server are built-into web2py.
CAS is an open protocol for distributed authentication and it works in the following way: When a visitor arrives at our web site, our application check in the session if the user is already authenticated (for example via a session.token object). If the user is not authenticated, the controller redirects the visitor from the CAS appliance, where the user can log in, register, and manage his credentials (name, email and password). If the user registers, he receives an email, and registration is not complete until he responds to the email. Once the user has successfully registered and logged in, the CAS appliance redirects the user to our application together with a key. Our application uses the key to get the credentials of the user via an HTTP request in the background to the CAS server.
Using this mechanism, multiple applications can use a single sign-on via a single CAS server. The server providing authentication is called a service provider. Applications seeking to authenticate visitors are called service consumers.
CAS is similar to OpenID, with one main difference. In the case of OpenID, the visitor chooses the service provider. In the case of CAS, our application makes this choice, making CAS more secure.
Running a web2py CAS provider is as easy as copying the scaffolding app. In fact any web2py app that exposes the action
## in provider app
def user(): return dict(form=auth())
is a CAS 2.0 provider and its services can be accessed at the URL
http://.../provider/default/user/cas/login
http://.../provider/default/user/cas/validate
http://.../provider/default/user/cas/logout
(we assume the app to be called "provider").
You can access this service from any other web application (the consumer) by simply delegating authentication to the provider:
## in consumer app
auth = Auth(db, cas_provider='http://127.0.0.1:8000/provider/default/user/cas')
When you visit the login url the consumer app, it will redirect you to the provider app which will perform authentication and will redirect back to the consumer. All processes of registration, logout, change password, retrieve password, have to be completed on the provider app. An entry about the logged-in user will be created on the consumer side so that you add extra fields and have a local profile. Thanks to CAS 2.0 all fields that are readable on the provider and have a corresponding field in the auth_user table of the consumer will be copied automatically.
Auth(..., cas_provider='...') works with third party providers and supports CAS 1.0 and 2.0. The version is detected automatically. By default it builds the URLs of the provider from a base (the cas_provider url above) by appending
/login
/validate
/logout
These can be changed in consumer and in provider
## in consumer or provider app (must match)
auth.settings.cas_actions['login']='login'
auth.settings.cas_actions['validate']='validate'
auth.settings.cas_actions['logout']='logout'
If you want to connect to a web2py CAS provider from a different domain, you must enable them by appending to the list of allowed domains:
## in provider app
auth.settings.cas_domains.append('example.com')
Using web2py to authorize non-web2py apps
This is possible but dependent on the web server. here we assume two applications running under the same web server: Apache with mod_wsgi. One of the applications is web2py with an app proving access control via Auth. The other can be a CGI script, a PHP program or anything else. We want to instruct the web server to ask permission to the former application when a client requests access to the latter.
First of all we need to modify the web2py application and add the following controller:
def check_access():
    return 'true' if auth.is_logged_in() else 'false'
which returns true if the user is logged in and false otherwise. Now run a web2py process in background:
nohup python web2py.py -a '' -p 8002Port 8002 is a must and there is no need to enable admin so no admin password.
Then we need to edit the Apache config file (for example "/etc/apache2/sites-available/default") and instruct apache so that when the non-web2py program is called, it should call the above check action instead and only if it returns true it should proceed and respond to the request, else if should deny access.
Because web2py and the non-web2py application run under the same domain, if the user is logged into the web2py app, the web2py session cookie will be passed to Apache even when the other app is requested and will allow credential verification.
In order to achieve this we need a script, "web2py/scripts/access.wsgi" that can play this trick. The script ships with web2py. All we need to do it tell apache to call this script, the URL of the application needing access control, and the location of the script:
<VirtualHost *:80>
   WSGIDaemonProcess web2py user=www-data group=www-data
   WSGIProcessGroup web2py
   WSGIScriptAlias / /home/www-data/web2py/wsgihandler.py

   AliasMatch ^myapp/path/needing/authentication/myfile /path/to/myfile
   <Directory /path/to/>
     WSGIAccessScript /path/to/web2py/scripts/access.wsgi
   </Directory>
</VirtualHost>
Here "^myapp/path/needing/authentication/myfile" is the regular expression that should match the incoming request and "/path/to/" is the absolute location of the web2py folder.
The "access.wsgi" script contains the following line:
URL_CHECK_ACCESS = 'http://127.0.0.1:8002/%(app)s/default/check_access'which points to the web2py application we have requested but you can edit it to point to a specific application, running on a port other than 8002.
You can also change the check_access() action and make its logic more complex. This action can retrieve the URL that was originally requested using the environment variable
request.env.request_uriand you can implement more complex rules:
def check_access():
    if not auth.is_logged_in():
       return 'false'
    elif not user_has_access(request.env.request_uri):
       return 'false'
    else:
       return 'true'